
There are so many wonderful benefits to wooden toys. No batteries, no plastic, so much of a longer lifespan…but the downside for me has always been the price tag. I would love to fill my children’s playroom with nothing but beautiful wooden toys, but it would cost me an entire months mortgage payment to do so. So I set out to find another solutions. And as always, Amazon delivered!
I began searching for “unfinished wooden toys” and “natural wood toys”. I was shocked at how many options there were! I started by simply purchasing wooden blocks and mini peg men. The prices on these were unbeatable. I then found a rainbow (similar to the Grimm’s rainbow, which retails for $129 for just $39 on Amazon.) I also found a shape sorter and a shape stacker. I also purchased a 2 sets or wooden beads from Joann’s to make a threading station for Emmy.
Here are all the links for the toys:

How to Dye Wooden Toys at Home
When it came to adding color to the toys, I opted for more of a stain versus a paint. I personally love the way the natural wood grain is still seen through the toys and is not covered up by a thicker paint. I tried two different methods to stain: an actual wood stain in a variety of colors and food coloring and water.

When it came to the wood stain, I had high hopes for it considering it was not a cheap route. Each bottle of stain was $7 but I was lucky enough to find it on a BOGO week. I definitely was not disappointed! The colors were rich and vibrant and application was easy! There was no guessing with measurements or water to food coloring ratio. The blocks below were colored using the Folk Art Ultra Dye.

Each bottle of stain was large enough to stain a TON of toys and I barely put a dent in it with doing the blocks. So if you are ok with spending a little extra and want extra vibrant colors, then go with a stain. (For reference in all the photos, the blocks are the only thing I used the stain on, all other toys were done with food coloring and water).
I was also super pleased with the budget version of just food coloring and water. Here’s the details on how I completed dying wooden toys with water and food coloring.
Dying Wooden Toys with Food Coloring + Water
To dye the toys with food coloring and water, I stared with just 7-10 drops of each color. I then added a small (very small, think a tablespoon or less) and tested the color on a small part of the toy. Based on how the color turned out, I would either add more food coloring or more water. I figured it was better to have to add more water than waste food coloring.
For the rainbow, I was able to alter the colors by adding additional coats to make a simple red shade just a few shades darker or add additional drops to the blue to make one arch darker than the last. This was definitely a perk to food coloring versus the stain: I had more control over the color options!

For the rainbow, I chose to use a simple sponge brush to color the arches. For the small beads. I used a plastic bag to color. Simply mis your few drops of color and water into a bag, add in your wooden object and move the object around until it is fully colored. From there, I could place the objects on paper plates with a paper towel to dry.
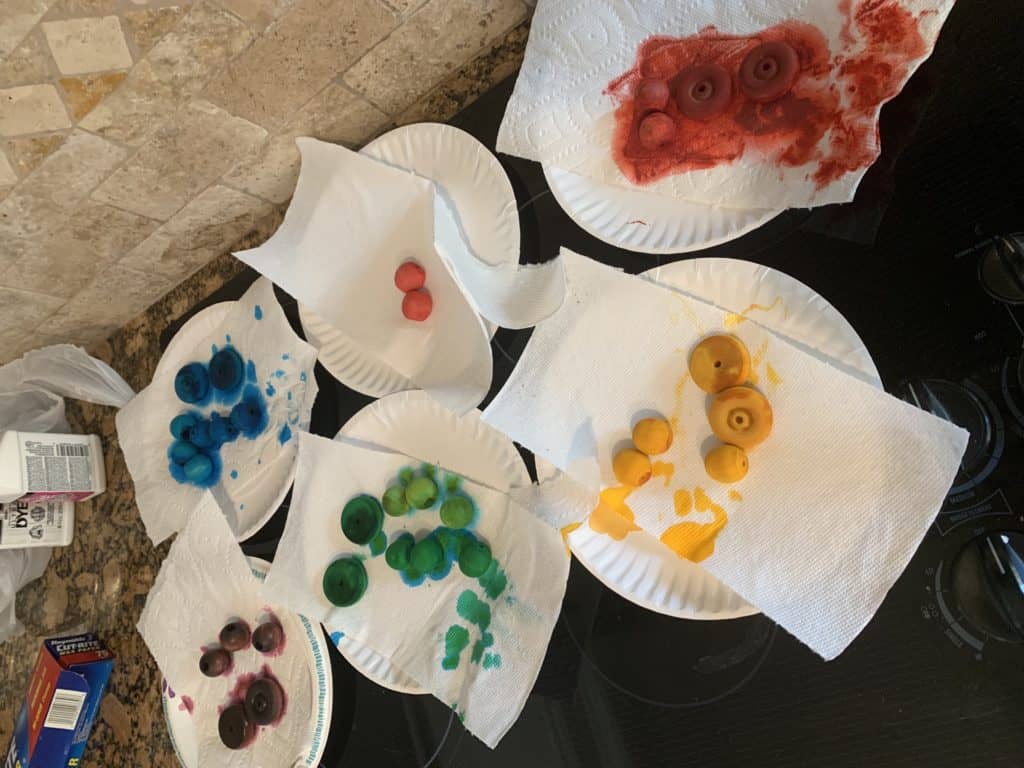
I let the pieces dry overnight before allowing the girls to play with them. It’s been about a month since coloring and the colors have stayed vibrant! So in my honest opinion, there is no need to spent tons on money on fancy stains: food coloring and water is a cheap route that provides great results!
All of our wooden toys have been a hit with our girls and I can’t deny that I really enjoyed having a project for myself to do!